
It’s frustrating when you are trying to achieve a well-manicured lawn and your edger just keeps shutting down and won’t stay running.
An edger starts then dies when the engine isn’t getting sufficient air, fuel, and spark.
This may be due to a clogged air filter, plugged spark arrestor, plugged cooling system, wrong choke setting, plugged fuel filter, clogged fuel line, dirty carburetor, bad spark plug, or faulty ignition coil.
Take the proper safety precautions by removing the spark plug wire before performing repairs. Follow all safety guidelines listed in your operator’s manual.

This post may include affiliate links. Purchases made through these links may provide a commission for us, at no extra cost to you. As an Amazon Associate, we earn from qualifying purchases.
Follow all safety instructions provided in your equipment operator’s manual before diagnosing, repairing, or operating. Consult a professional if you don’t have the skills, or knowledge or are not in the condition to perform the repair safely.
This is Why an Edger Starts Then Dies: Starts Then Stalls
1. Wrong Choke Setting
A choke is used to restrict the amount of air the engine receives. You will find a choke lever or knob on your edger.
The fuel must run rich with more fuel and less air to start a cold engine. The choke lever must be in the CHOKE ON position to restrict air to start a cold engine.
Once the engine warms, the choke must be adjusted to the off position so the engine receives enough air to keep running.
The choke lever must be in the CHOKE OFF position when starting a warm engine.
SOLUTION: Make sure the choke is placed in the correct starting and running positions. Your edger won’t keep running when the choke isn’t adjusted properly.
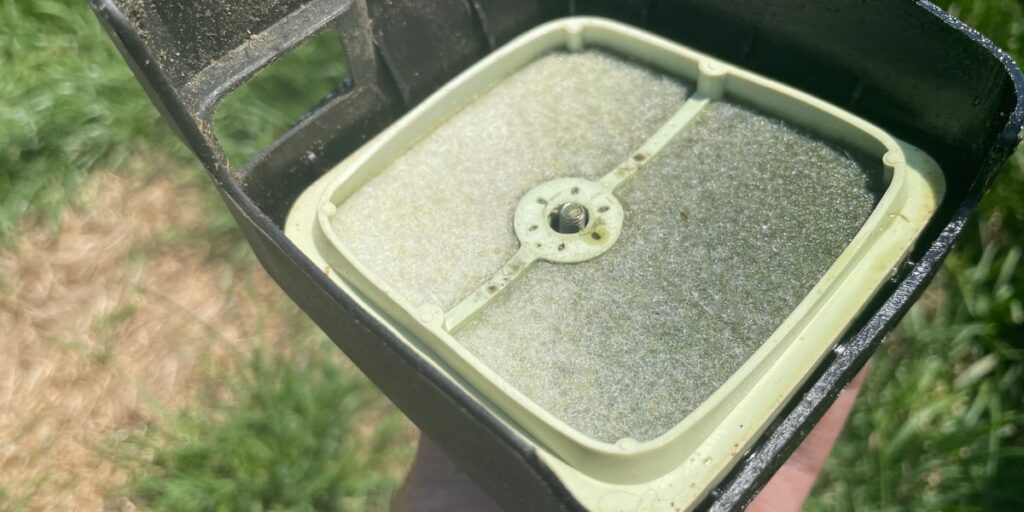
2. Clogged Air Filter
The air filter is essential to ensure the engine receives clean air for combustion. It keeps out dirt and debris that can permanently damage the engine.
The air filter should be replaced at least once a year and more often if you use it more than the average homeowner. Your air filter maintenance doesn’t stop there, you must regularly check and clean it.
If you don’t perform maintenance on your air filter, it can become clogged with dirt and debris restricting airflow. When the engine isn’t getting enough air, the engine will quit running.
When you find your air filter is very dirty or damaged you should replace it with a new one.
NEVER remove your filter and run the edger without one even if it’s just to finish a job. Doing so can cause dirt to contaminate the engine causing permanent damage.
SOLUTION: I have listed cleaning procedures for a couple of common types of filters used on edgers. If you are unsure what type of filter is installed on your equipment and how to properly clean it, consult your owner’s manual.
How to Clean a FELT Edger Air Filter:
- Remove the air filter cover.
- Remove the air filter being careful not to allow dirt to fall into the air intake.
- Wipe any dirt or debris remaining in the air filter cover or housing.
- Brush the dirt off the air filter.
- Wash with water and a mild detergent.
- Rinse the filter until the water runs clear and allow it to dry.
- Install the clean filter.
- Reattach the air filter cover.
How to Clean a FOAM Edger Air Filter:
- Remove the air filter housing cover.
- Remove the air filter being careful not to allow dirt to fall into the air intake.
- Wipe out any dirt that remains in the housing.
- Reuse the filter if it is in good condition and not brittle, forming dark spots, or has tears in the filter. Purchase a new foam air filter if you find any of these conditions.
- Wash a filter that is able to be reused. Use mild dish soap and water to remove dirt. Rinse until clear.
- Lay flat to dry.
- Once completely dry, coat with oil. Squeeze to remove excess oil.
- Insert the clean filter.
- Reattach the cover.
Because there are so many different types of filters used which varies from model to model, refer to the operator’s manual for steps to clean the type of air filter used in your edger.
3. Plugged Cooling System
When the engine gets too hot, the edger may shut down. To keep the engine cool, it requires air to circulate around the engine.
SOLUTION: Remove all grass clippings, dirt, and debris from around the air intakes and cooling fins that may be preventing air circulation. To do this, first, remove the spark plug and wait for the engine to cool.
Remove the engine cover and remove debris from the cover and around the outside of the cylinder. Clean the cylinder fins and reinstall the engine cover. Continue cleaning the edger to make sure cool air can circulate around the engine.
4. Old or Bad Fuel
Gasoline that has been sitting around for over 30 days can break down and become less effective.
Old fuel attracts moisture that can leave behind varnish and sticky deposits that clog the fuel system and cause components to fail. Ethanol-based gasoline can have negative effects on your edger.
Use unleaded gasoline with a minimum octane rating of 89 and a maximum ethanol content of 10%. A low ethanol content or ethanol-free fuel is best for your fuel system and engine.
Add a fuel stabilizer like Sea Foam Motor Treatment when you are unable to use fuel within 30 days of purchase.
Most edgers today use a 2-cycle (2-stage) engine that requires gasoline and oil to be mixed before filling the fuel tank.
You will also find manufacturers beginning to release 4-cycle (4-stage) edgers to the market. Oil and gas are not mixed for these types of engines.
- 2-cycle engines require gas and oil to be mixed before adding to the fuel tank.
- 4-cycle engines require straight gas. There are separate fill ports for gas and oil. (The exception to this is STIHL’s 4-MIX engines that use a gas and oil fuel mix).
Know what type of engine is on your edger so you don’t ruin your equipment. Adding the wrong type of fuel to your edger can damage the unit beyond repair.
SOLUTION: Drain the fuel tank. Mix fresh fuel and a fuel additive in an approved gas container. Add the mixture to the fuel tank.
5. Plugged Fuel Filter
To keep dirt and debris from entering the fuel system, you will find a small filter located inside the fuel tank. It is attached to the end of the fuel line. The filter can become plugged when it isn’t replaced regularly.
The fuel restriction caused by the plugged filter can keep your edger from running. I recommend changing the fuel filter annually or more often when needed.
You may have to replace it as much as every 3 months when using it for commercial purposes.
SOLUTION:
Replace an Edger Fuel Filter
- Wipe around the fuel cap to remove dirt and debris so they don’t fall into the tank.
- Remove the cap.
- Take note of the placement of the filter so you install the new filter in the correct position.
- Pull the fuel filter out of the fuel tank. A clean bent wire works well to retrieve the filter.
- Once the filter is out of the tank, remove it from the fuel line. Be careful not to lose the retaining ring. Keep the ring on the fuel line.
- Attach the new fuel filter by inserting the male end into the fuel line and securing the line to the filter using the retaining ring.
- Place the fuel filter back inside the fuel tank.
- Install the fuel cap.
6. Clogged Fuel Lines
The deposits left behind by old fuel can cause a buildup in the fuel lines that will prevent a good flow of fuel from running through them.
When you find a clogged fuel line, remove the line and try to remove the restriction using carburetor cleaner to loosen the clog and compressed air to remove the clog.
SOLUTION: If the fuel line is dry, cracked, or damaged, you should replace it with a new fuel line.
7. Plugged Fuel Tank Vent
There is a vent on your edger that allows air to enter the fuel tank as fuel is consumed. Without a vent, the fuel tank will form a vacuum keeping fuel from flowing out of the fuel tank causing your edger to stop running.
If your edger quit running and won’t restart, you may have a clogged fuel vent.
Perform this simple test to identify a clogged fuel tank vent.
- Place the edger on a level surface.
- Loosen the fuel cap to allow air into the tank and start the edger.
- Don’t allow gas to spill out of the fuel tank.
- If the edger starts and runs, tighten the fuel cap. You can further confirm the tank vent is the problem by trying to replicate the problem where the edger runs sluggish and quits until you loosen the cap to allow air into the tank.
Replace the vent with a new fuel tank vent. This is a small part that is found coming off a line out of the fuel tank or it may be built into the fuel cap.
8. Dirty Carburetor
The carburetor mixes the correct proportion of fuel with the air that is required for your edger to run. The passageways can become clogged and the small components can fail to function correctly.
This can cause an insufficient amount of fuel mixed with air resulting in a rough running edger that may just quit. You may be able to clean your carburetor to get it working again.
You may end up having to rebuild it (if rebuild kits are available for your carburetor) or replace the carburetor if cleaning doesn’t help.
SOLUTION: Before replacing a carburetor, I recommend comparing the cost of the carburetor and labor expense to the cost of a new edger.
Depending on the model, cost, and age of your edger, you may be better off purchasing a new one.
9. Dirty or Bad Spark Plug
When the spark plug is worn or becomes dirty, it may provide an intermittent spark that may cause the engine to die. Remove the spark plug and inspect its condition.
SOLUTION: If you find the tip is very dark in color, the electrode is burnt or the porcelain is cracked, it’s time to replace the spark plug. If it’s just a little dirty, you can try to clean it with a wire brush.
Check the electrode gap and make sure it meets the manufacturer’s specifications. Once you have confirmed the spark plug is good and the gap is correct, reinstall the spark plug.
Wait to attach the spark plug wire until you have completed all repairs.
10. Bad Ignition Coil
The winding on the ignition coil can separate and short out. When this happens, the spark plug won’t get the voltage required to create a spark. This will cause your edger to die after it’s been running.
SOLUTION: Identify a bad ignition coil using an ohmmeter to check for a break in continuity. Replace the ignition coil if you find a break.
11. Plugged Spark Arrestor
You will find a small metal screen installed on the muffler of your edger. This is installed to keep hot exhaust material from shooting out of the edger and causing injury or starting a fire.
Carbon can build up on the screen restricting airflow. This will make your edger run sluggish and quit.
SOLUTION: Disconnect the spark plug wire. On most edger models, you will remove the engine cover and the engine exhaust cover to access the spark arrestor screen. Carefully remove the spark arrestor screen and clean it with a wire brush
If the screen isn’t able to be sufficiently cleaned or you find it is damaged or has a hole in it, replace it with a new spark arrestor screen.
Contact your local service center or small engine mechanic if you are having trouble locating the spark arrestor screen or if you are continuing to experience problems with your lawn edger.