
It can get pretty frustrating when you have a limited amount of time to get your yard care done and find your lawn mower won’t start.
When you own a lawn mower long enough, you’re bound to run into this problem. Use this guide to help identify your problem so you can get back to mowing again.
A Grasshopper lawn mower won’t start when there isn’t sufficient air, fuel, and spark. This can be due to a plugged air filter, clogged fuel lines, a plugged fuel filter, a dirty carburetor, old gasoline, a bad fuel pump, faulty spark plugs, a bad switch, or a dead battery.
Keep reading for a complete list of items that can cause a starting problem in your Grasshopper lawn mower. Follow all safety precautions outlined in your Grasshopper operator’s manual.

This post may include affiliate links. Purchases made through these links may provide a commission for us, at no extra cost to you. As an Amazon Associate, we earn from qualifying purchases.
Follow all safety instructions provided in your equipment operator’s manual before diagnosing, repairing, or operating. Consult a professional if you don’t have the skills, or knowledge or are not in the condition to perform the repair safely.
Reasons Your Grasshopper Lawn Mower Won’t Start
Empty Gas Tank
Everyone knows a Grasshopper gas-powered mower requires gas to run. It can be easy to skip checking this simple step out of frustration when you can’t get your mower to start.
This is just a quick reminder to check the fuel level. You may have forgotten the last time you fueled up or you could have developed a fuel leak causing the tank to empty sooner than expected.
Repair: Add fresh fuel to your gas tank. Check for fuel leaks on your Grasshopper lawn mower and make the necessary repairs.
Using the Wrong Type of Fuel or Old Fuel
Type of Gas
A Grasshopper gas-powered lawn mower uses unleaded gasoline with an ethanol content of 10 percent or less. It must also have a minimum 87-octane rating. Do not use gas with a higher ethanol content as ethanol can cause significant damage to a Gravely engine.
The lower the content of ethanol your fuel has, the better. Read my article on the type of gas zero turn mowers use for more details on choosing the right gas.
Use Fresh Fuel
Old gasoline can keep your mower from starting. Gasoline can become less effective and break down as soon as 30 days after purchase. The gasoline and ethanol mixture can damage your fuel system and engine.
The moisture ethanol attracts will leave gummy deposits in the fuel system. This will clog fuel components keeping your Grasshopper’s engine from getting the fuel it requires to form an explosion in the engine to start.
Repair: Drain and flush the fuel tank using a fuel siphon. Add fresh fuel with a fuel additive to stabilize your fuel and clean your fuel system like Sea Foam Motor Treatment.
You can find out more about fuel additives and why I choose to use Sea Foam in my zero turn here.
Bad Spark Plug or Loose Connection
A fouled spark plug that has carbon buildup or oil on the plug can cause the engine to misfire and not start. A plug that is damaged isn’t properly gapped or has a loose connection can also cause starting problems in your Grasshopper.
Repair: Remove your spark plugs and inspect them for signs of carbon buildup, a cracked porcelain insulator, or burnt electrodes. Replace with new spark plugs.
Make sure they are correctly gapped according to the engine manufacturer.
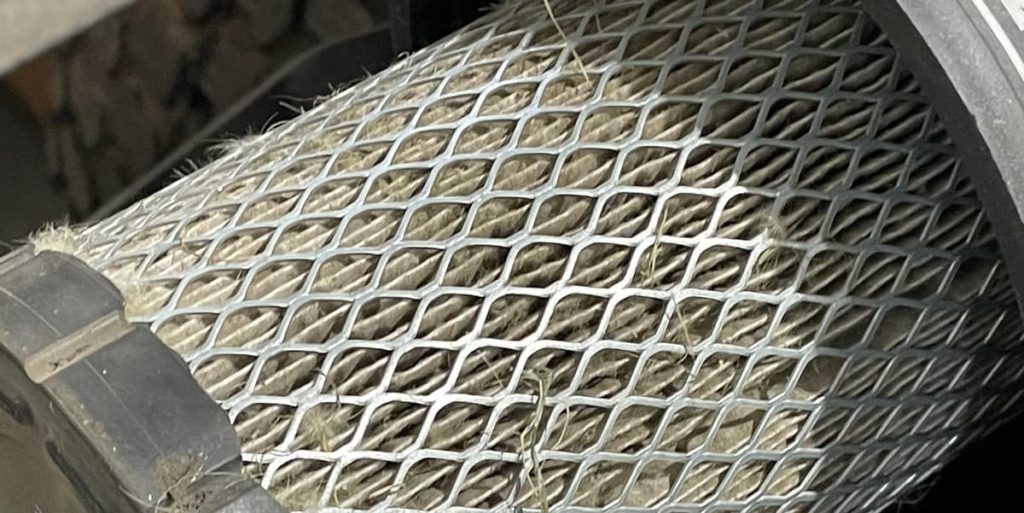
Plugged Air Filter
The air filter is a component on your Grasshopper used to keep dirt and debris from entering the air intake and wearing on the engine shortening its lifespan.
When it isn’t checked, cleaned, or replaced regularly, the filter can become plugged causing your mower to shut down. This is because a plugged filter will not allow a sufficient amount of air to pass through the filter.
Not only will a plugged air filter cause your mower not to start, but it can also cause your Grasshopper to overheat resulting in engine damage.
I recommend starting each season with a new air filter. The average Grasshopper homeowner should check and clean it several times per season to keep it in good condition and more often if you are mowing in dusty conditions.
If you’re using it for commercial mowing purposes, check and clean it daily. Never run your mower without an air filter. Doing so can compromise the engine causing significant harm when dirt and debris get introduced to the engine.
This can result in wear on the engine including damage to the seals and scoring of the cylinder. If your Grasshopper starts and runs, but begins to run sluggishly, overheat or lose power, check the air filter.
Repair: Inspect the air filter, clean and reuse it if possible. Replace it if necessary.
- Remove your paper air filter from the air filter housing.
- Wipe out any remaining dirt in the housing being careful not to allow dirt to fall into the air intake.
- Tap your air filter against a solid surface to loosen dirt so it falls out of the filter. Do not use compressed air to clean the filter as this can damage the paper element.
- Hold your clean filter up to a light source. If you can see light shine through the paper element, it is safe to reuse it. If you don’t see light, it is covered in oil or if is very dark in color you must replace your old filter with a new one.
Bad Fuel Pump
A fuel pump is used to pump gas to the carburetor when the carburetor is placed higher than the fuel tank. When the pump is no longer able to build pressure using the vacuum in the crankcase, it must be replaced.
Sometimes you can visibly recognize damage. The housing may have a small crack or fuel may be leaking from the seams when a pump is bad.
Other times you will have to test fuel flow to determine if the fault of your Grasshopper’s starting problem is due to a bad fuel pump.
Repair: To identify you have a bad fuel pump, first verify you are getting fuel flow to the fuel pump by checking for fuel out of the line connected to the inlet port on the pump.
Once you confirm you are getting fuel to the pump, you will proceed with testing the pump to make sure a steady or pulsating flow of gas is being pumped out of your fuel pump.
Use the fuel shut-off valve or fuel clamps to start and stop the flow to test fuel flow. You can also use hose pinch pliers to crimp the line to stop the flow. With the fuel flow stopped, remove the fuel line from the carburetor and place it in a container.
Start your fuel flow and start your mower. Watch for a steady or pulsating flow out of the line into the container. If you aren’t getting sufficient fuel flow, your fuel pump may be damaged and will need to be replaced.
Plugged Fuel Filter
The fuel filter is essential to keep dirt out of the fuel system. It strains fuel as it comes out of the fuel tank. When it isn’t changed regularly, the fuel filter can become plugged restricting the amount of fuel flowing to the engine.
I recommend replacing the fuel filter annually to keep it in good condition and functioning properly.
Repair: Install a new fuel filter with the arrow on the side of the filter pointing in the direction of your Grashopper’s fuel flow.
Clogged Fuel Line
Deposits from old fuel and dirt can become lodged in your mower’s fuel line. Without a source of fuel, because it is being blocked, your Grasshopper mower is no longer able to start.
Check for a blockage in your fuel line by stopping your fuel flow. Identify a section of the fuel hose and remove the line furthest from the fuel tank.
Place it in a container placed lower than the fuel tank. (This is because fuel can’t run uphill without the assistance of a pump). Place the hose in a container and start the fuel flow.
If you are not getting sufficient flow, you will need to remove the line and remove the restriction.
Repair: Remove the fuel line, spray carburetor cleaner into the tube, and use compressed air to blow air through the tube until the line is free of debris and gummy residue. If you are unable to clear the clog you will need to replace the fuel line.
Dirty Carburetor
A carburetor is an important component designed to regulate the amount of gas that is mixed with air to form combustion in the cylinder so your Grasshopper will start and run.
The deposits and varnish left behind by old fuel can clog the fuel jet or gum up the internal parts so they no longer function properly. When this happens, you will have to take your carburetor apart to clean it.
You may have to rebuild it if you find broken internal parts or replace it when it will not function after cleaning it.
Repair: You can clean the carburetor yourself if you don’t mind working with small parts and you are a little mechanical. A local small engine repair shop can also do this for you.
You can find steps for cleaning your carburetor here if you choose to clean it.
Bad Gas Cap
The fuel tank must vent to allow air into the tank to equalize pressure. Without a vent, the fuel tank will form a vacuum and not allow fuel to leave the tank and flow through the fuel lines. Your Grasshopper will be starved of fuel and not start.
You will find the vent is located in the gas cap on your Grasshopper. To determine whether you have a plugged vent, remove the cap and attempt to start your mower.
If the mower starts because air is allowed into the tank, there is a good chance your problem is the gas cap.
To further confirm this finding, reinstall the gas cap while allowing the mower to run so try to replicate the problem where your mower will die and not start until you remove the cap.
Repair: I find it best to replace a Grasshopper gas cap that no longer vents. Cleaning doesn’t always
Bad Battery, Loose Cables, or Corroded Terminals
A battery that is weak or no longer holds a charge can cause a Grasshopper mower not to start. When you are looking at the battery, you should also look at the cables and terminals.
Your starting problem may also be the result of a bad connection with the battery. This can happen when the cables are loose or the terminals are corroded.
Repair: Clean corroded terminals in a baking soda solution containing 2 cups of water and 3 rounded tablespoons of baking soda. Use a wire brush to scrub the terminals clean.
Test your battery with a multimeter. You will want a reading at about 12.7 volts. Place on a charger to charge your battery if your reading is less than this.
Read more about the steps and items needed to charge your battery here. If your battery does not hold a charge, you will need to replace it with a new battery.
Bad Safety Switch
Your Grasshopper lawn mower may use several safety switches designed to keep the operator safe. The manufacturer installs safety switches to prevent the mower deck from running without the operator present.
It also has a safety switch to prevent the mower from starting when your parking brake isn’t engaged. If these safety switches fail, your mower may not start or die on you.
Repair: Test the switch using a multimeter or you can temporarily bypass the safety switch to identify a bad switch.
Do not operate a mower without the safety switch. Never run a mower when a safety switch is bypassed. You never know when you will encounter a situation where the safety switch can save you from serious injury.
Bad Ignition Switch
You insert the key into your ignition switch and turn it only to find your Gravely doesn’t start or even turn over. The ignition switch could be the problem.
Repair: You can use a multimeter to test the ignition switch. Replace the switch if bad.
Bad Ignition Coil
The ignition coil provides voltage to the spark plug so it can fire and start the engine. The engine will not start if the spark plug isn’t able to fire.
Repair: After you verified your spark plug is in good condition, check the continuity of your ignition coil using a multimeter. Replace the ignition coil if you find a break in the continuity.
Faulty Charging System
While the charging system isn’t the main reason your Grasshopper won’t start, it can contribute to a weak battery. The charging system is important to keep your battery charged.
If you find your battery keeps dying and you have to keep placing it on a charger, you may have problems with the charging system. When a component of this system fails, your Grasshopper mower will not start because the battery will not provide enough power.
There are many components that can prevent your charging system from working properly. This includes the stator or alternator. Read more about the steps to test your charging system here using an ohm meter.
Repair: When you find your Grasshopper is no longer starting due to the charging system, it’s time to take your mower to a small engine mechanic who is experienced with the zero-turn charging system.
If you don’t have experience with charging systems, you will most likely just throw different parts at your mower hoping to fix it.
The cost of all of these parts can get pretty expensive if you don’t guess right the first time. Most lawn mower retail stores do not allow the return of electrical parts so you will be stuck with the part whether it is the problem or not.
Incorrect Starting Procedure
There are steps to follow when starting your Grasshopper mower for safety reasons. If you don’t follow these steps, your mower won’t start.
Steps to start a Grasshopper zero-turn mower:
- Sit in the operator’s seat.
- Make sure the parking brake is on.
- The steering levers must be apart and in an outward position.
- Place the throttle lever at about 1/3 of the way.
- Adjust the choke to the on position, if needed, to start a cold engine.
- Place the key in the ignition switch and start the mower.
- Adjust the choke to the off position once the engine has warmed.
- To move the mower, release the parking brake and move the steering levers together.
Repair: Refer to your Grasshopper operating manual to ensure you are starting and operating your lawn mower correctly so you don’t set off the safety features that shut off your mower or cause it not to start.