
Completing a full service on your Husqvarna mower is necessary to keep your mower operating at its best and extend its life. Purchasing a Husqvarna riding mower is a significant investment to care for your lawn. Make sure you protect that investment and complete a full service once a year.
I have put together a list of items that should be checked annually. Use this list along with your operator’s manual to complete your service.

Steps to Service Your Husqvarna Riding Mower
Step 1: Gather Your Tools & Supplies
Tools
- Socket or spanner wrenches
- Filter wrench
- Deck scraper and/or wire brush
- Plastic funnel
- Oil drain pan
Supplies
- Engine oil
- Engine oil filter
- Spark plugs
- Air filter
- Fuel filter
- Grease
- Spray lubricant
- Rubber gloves and heavy work gloves
- Rags or paper towel
- Mower blades if not sharpening and reusing current blades
- Fuel stabilizer
- Cardboard or newspaper to cover the work surface
Step 2: Prepare Your Mower for Maintenance
Park your Husqvarna on a flat-level surface. Allow it to run for a few minutes to warm the engine oil. Warm engine oil flows better than cold oil. Place cardboard or newspaper under your mower to prevent oil from dripping onto the ground surface.
Before you begin working on your mower, it is important to take a few steps to ensure your Husqvarna doesn’t move or start while you are working on it.
- Set your parking brake.
- Shut off your mower and remove the ignition key.
- Disconnect the spark plug wires.
- Take caution working around the hot engine, hot transmission, and sharp mower blades
- Check your owner’s manual for additional safety tips
Step 3: Change the Engine Oil
Place your oil drain pan under the engine oil drain plug or drain hose, depending on the type your mower model uses. Use a rag to clean around the oil fill area and the drain plug to prevent debris from entering the crankcase.
Now proceed with the following steps to change your engine oil:
- Remove your drain plug and allow the oil to run into the drain pan. You can locate your drain plug or hose under the hood and on the side of the engine near the bottom of the engine.
- Remove the dipstick from the oil fill to allow the oil to flow faster.
- Once the oil has completely drained, reinstall the drain plug.
- Remove your engine oil filter. Use a filter wrench to help loosen the filter. Make sure you are prepared to catch the oil that will come out of the used filter.
- Place a light film of fresh oil on the seal of your new replacement oil filter and install it on your Husqvarna.
- Add new oil to your crankcase until it is at the manufacturer’s required oil level. Use the dipstick to verify you have the right amount of oil. You want the oil to be at the full level on your dipstick. Running your mower with a lower or higher oil level can cause engine damage and running problems. It is important to get this step right.
- Wipe off any oil that may have gotten on your Husqvarna mower. Place your used oil in a container for recycling. I like to reuse my engine oil bottles and mark them “For Recycling” so I don’t mix them up with new bottles of oil. Make sure you find a recycling center to dispose of used oil. Some auto supply retail stores will accept oil for recycling.
Step 4: Replace the Spark Plug
Remove your spark plug(s) using a 3/4” or 5/8” socket depending on your engine model. Replace with a new spark plug(s).
These should be replaced annually during your Husqvarna service so you don’t encounter starting or running problems during the season from running bad spark plugs.
Make sure your spark plugs are gapped to the engine manufacturer’s recommendation. Do not reattach your spark plug wires while you are still performing maintenance on your mower. You will reattach them once your service is complete.
If you don’t change your spark plug, you must inspect them and clean them if necessary. Check for a broken porcelain or burnt electrode that will require replacement.
Step 5: Remove Dirt & Debris around Your Cooling Fins and Engine
The area around your engine must be kept cool. When debris collects in your cooling fins and around your engine, air can’t circulate around your engine block and cylinder to keep it cool.
Remove your engine cover and clean the debris around your engine and cover. Remove the debris collecting around your engine cooling fins.
Step 6: Remove Dirt & Debris from Your Hydro Fans and Transmission Area
The hydro fans keep your transmission cool. Clean the debris and dirt from your fans and the transmission area. Be careful when working around your transmissions as they may be hot.
Step 7: Clean the Battery Terminals
Clean any corrosion that has developed on your battery terminals using a baking soda and water solution consisting of 2 cups of water and 3 heaping tablespoons of baking soda. Use a wire brush to remove the corrosion. Make sure your terminals are making good connections.
Step 8: Remove Debris Around Your Electrical Components and Wiring.
Moisture can collect on the debris and in turn start to corrode your electrical components and cause them to prematurely fail. Remove debris that has collected around your electrical components and wiring.
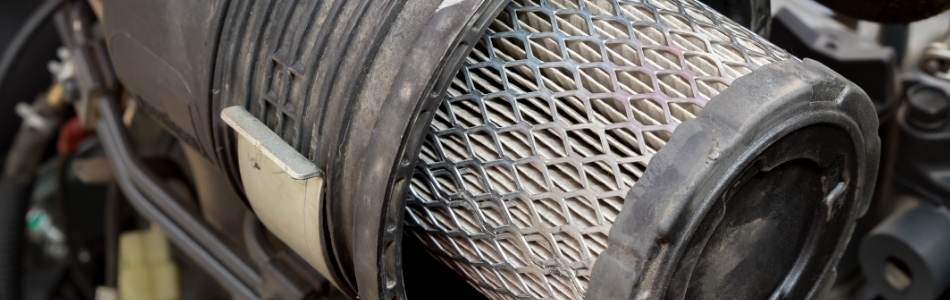
Step 9: Replace Your Air Filter
You should replace your air filter at least once a year and more often when operating in dry dusty conditions. Remove the air filter from the air filter housing.
Wipe any dirt that remains in the housing with a dry cloth to remove it. Do not allow any dirt to fall into the air intake. Install a new air filter into the housing and replace the housing cover.
While your air filter should be changed annually, you must regularly check and clean your filter during the mowing season. Check out my article on air filters to find cleaning instructions.
Step 10: Replace Your Fuel Filter
This is another filter that should be changed annually. Shut off your fuel supply using your fuel shut-off valve or crimp the fuel line. Remove your fuel filter and replace it with a new filter.
There should be an arrow on the filter housing. Your fuel filter needs to be installed with the arrow pointing in the direction of the fuel flow.
Step 11: Check the Fuel System
Check the fuel system for leaks. Follow the fuel line from your fuel tank up to the carburetor. Check the fuel line and components for leaks. Make sure the hose connections are tight and there are no leaks. Reference this article for all the places on your Husqvarna to check for a fuel leak.
Step 12: Check Your Husqvarna Tire Pressures
A low tire can cause steering issues and an unleveled mower deck gives you a bad mowing experience. Check your tire pressures using a tire pressure gauge. Make sure your lug nuts are secure and the tire pressures are at the psi level shown on the tire sidewalls.
Step 13: Remove Dirt and Debris from the Top of Your Deck
Debris can collect on your mower deck which can restrict the movement of your tensioner bracket and interferes with the movement of your belt around your pulleys.
Dry debris on your mower deck increases the risk of fire when exposed to the heat and friction of the mower belt.
Place your mower deck at its lowest position. Remove the belt covers if the mower deck has them. Remove the debris under your pulleys and brackets and from the top of your mower deck.
If you are unable to gain access to the top of your deck to clean and check your components, you may have to remove them. Follow the instructions in your owner’s manual for instructions on removing your deck.
Step 14: Check the Pulleys and Belts
Now that the top of your mower deck is clean, check the pulleys and belts on your mower deck to ensure they are in good condition. A worn belt must be replaced.
Signs of a wearing belt include cracking, a shiny glazed appearance, and shredding. A belt that has been stretched and no longer sits tight to the pulleys must also be replaced.
A pulley must sit flat and parallel to the deck. When a pulley doesn’t sit securely on the deck and there is some vertical movement, the pulley must be replaced.
To check for a bad bearing, slowly spin each pulley by hand. Feel for a restriction or a noise coming from the bearing. These are both signs of a bad bearing and the pulley will need to be replaced.
Clean any rust you find on the pulleys. Rust can dry out your belt causing it to be prone to breaking. Extremely rusty pulleys should be replaced.
Step 15: Scrape the Deck & Check Your Mower Blades and Spindle Housings
Gain access to the bottom of your Husqvarna mower deck. With a heavy pair of work gloves, grab each end of a blade and rock the blade up and down. You are checking for damage in the spindle housing.
When you feel extra play and movement or you hear a knocking sound because of this extra movement, disassemble your spindle housings to identify the problem. Most likely, the bearing has failed and needs to be replaced.
Remove and sharpen your blades if they are still in good condition. You will need to replace blades that are bent, have large gouges in them, or are extremely worn. Very worn blades are ones where the ends of the blades begin to become rounded or the sail on the blade is thinner than the center of the blade.
Sharpen blades to put a sharp edge on the blade and to smooth out any small nicks in the blade edge. You can find instructions on sharpening and balancing your Husqvarna blades in my article here.
Scrape your Husqvarna mower deck to remove grass clippings and debris collecting under your mower deck using a deck scraper or wire brush. A plugged mower deck can cause your mower to give you an uneven cut. It will also put your engine under extra load.
Step 16: Check Your Mower Deck Level
Adjust Husqvarna Mower Deck: Side-to-Side
With your mower parked on a flat level surface and in its highest position, measure the left-hand side of the mower deck from the blade edge to the ground. Record the measurement.
Check the measurement on the right-hand side of your deck from the blade edge to the ground. Record the measurement. Adjust the mower deck until both measurements are the same.
To adjust the mower deck, use a wrench to turn the lift link adjustment nut located on the side of your mower. Turn the nut to the left to lower the mower and to the right to raise the mower.
Adjust Husqvarna Mower Deck Pitch: Front-to-Rear
Once your deck is leveled from one side to the other, make any adjustments needed for the pitch. Rotate your blade so one end is facing the front of your deck and the other end is facing the rear.
Measure the front of the mower from the blade tip to the ground and compare it to the measurement of the blade tip to the ground at the rear of the mower deck.
The front of the deck should sit 1/8″ to 1/2″ lower than the rear. To adjust the deck, loosen the jam nut on the front link adjustment, but do not remove it.
Next, turn the adjustment nut to the left to lower the front of the mower and to the right to raise it. Once the deck has been properly adjusted, hold the adjustment nut in place while tightening the jam nut.
Step 17: Check the Safety System
Your Husqvarna Riding Mower is equipped with a safety system to minimize injury when operating your mower. Husqvarna includes an operator presence control system that won’t allow the mower deck to run when it doesn’t sense the operator in the seat.
There are many other safety features put in place by Husqvarna. Reference your operator’s manual for a list of these safety features. Make sure they are in working order on your mower.
Never operate your Husqvarna when all these safety elements are not functioning correctly. Doing so can put you at risk of injury.
Step 18: Replace Damaged, Worn, or Missing Parts
Carefully inspect your Husqvarna to make sure all your hardware is secure and not missing. Replace any worn or missing parts.
Step 19: Grease Lubrication Points
You must lubricate your Husqvarna to prevent the wearing of and freezing up of the mower components. Locate the grease zerks on your front wheels, front axle, and deck wheels.
Locate any additional grease zerks on your mower and pump high-performance grease into the zerks. Spray lubrication into your lift linkages, pivot points, and brake to keep them moving freely.
Step 20: Wash Your Riding Mower & Dry it Completely
Remove debris from your mower and wash it using a garden hose. If using a pressure washer, do not use high pressure as this can cause damage to your sealed bearings.
Once you are finished, allow the mower to completely dry. Storing a mower with wet components can prematurely corrode your mower and cause electrical components to fail.
If you have a leaf blower available, blow air on your mower to remove the water remaining on your Husqvarna. If you are fortunate enough to have a nice sunny day, place your mower in the sun to dry and evaporate the moisture from your components.
A light breezy day works well too. Read more about cleaning your mower in this article.
Step 21: Complete if Placing Your Mower in Storage
I highly recommend completing the following steps when storing your Husqvarna during the off-season. This will help prevent potential problems that can develop over the winter season.
- Stabilize Your Fuel: Because gasoline can break down very quickly, you must use a fuel additive when storing your Husqvarna to protect the fuel system. Ethanol in your gasoline attracts moisture. The ethanol and moisture mixture will separate causing running problems and gumming of the fuel system. I like to use a fuel additive called Sea Foam. Read more about the advantages of Sea Foam here.
If you choose not to use an additive to stabilize your fuel, you should drain your Husqvarna mower of all fuel so it doesn’t sit all winter. Once the fuel is removed, start your mower and let it run until it shuts off. - Fully Charge Your Battery: A fully charged battery will not freeze during winter. Test your battery and make sure it is fully charged for winter. You can also remove your battery and store it in a cool dry location away from freezing temperatures. Just make sure it is not stored near any combustible items. Read more about preparing your battery for winter in “A Guide to Winter Lawn Mower Battery Care”.
- Use a Rodent Deterrent: Rodents can get into the garage and storage sheds. They can choose to make a home with your lawn mower. I have seen many mowers and lawn tractors over the years that have had extensive wire harness damage from rodents chewing on wires.
I use a product called Grandpa Gus’s Rodent Repellent. It comes in both pouch and sprays forms. It’s a small price to pay to protect your mower. I tuck the pouches in my mower, in the glove box of my recreational vehicle, and in my other equipment. I use the spray on the wiring harness in my mower, equipment, and on my trailers.
How Often Should You Change Your Husqvarna Mower Engine Oil?
You should change the engine oil in your Husqvarna mower after every 50 hours of use. If you have a new engine on your Husqvarna, you must perform an initial change after the first 5 hours of use.
Having Problems with Your Husqvarna Mower?
You may have completed a full service on your Husqvarna lawn mower hoping it would solve a problem you are experiencing with your mower. Unfortunately, changing these maintenance items didn’t solve your problem.
I have put together a list of common Husqvarna lawn mower problems and solutions to help you identify items that could fail to run your mower properly. You can find this list at “Common Husqvarna Lawn Mower Problems & Solutions”.