
It may be time to replace or sharpen your mower blades when your blades don’t give you the fresh cut you received when your lawn mower was new.
Have you ever been so proud of your perfectly cut lawn to only being deflated after you find the grass turned brown a couple of days later? I once thought something terrible must have happened to make my lawn brown.
Now I know it is most likely the result of dull lawn mower blades.
How Often Should I Change My Mower Blades?
Lawn mower blades need to be changed once a year. Mower blades should be changed more frequently if your yard includes sand, gravel, and rocks as these materials will prematurely dull and damage your blades.
Most people will tell you to change your mower blades once a year, but that is not always true.
There are several other reasons why you need to change your blades more frequently to ensure you are achieving the best cut with your mower and avoiding other significant problems that can result from running your mower with a damaged blade.

This post may include affiliate links. Purchases made through these links may provide a commission for us, at no extra cost to you. As an Amazon Associate, we earn from qualifying purchases.
Follow all safety instructions provided in your equipment operator’s manual before diagnosing, repairing, or operating. Consult a professional if you don’t have the skills, or knowledge or are not in the condition to perform the repair safely.
How Often Should I Sharpen My Mower Blades?
You should sharpen your lawn mower blades after every 25 hours of mowing or twice a year for the average homeowner. Again, if you notice brown spots on your grass a couple of days after mowing, you should sharpen your blades.
Mower Blade Design Can Cause Blades to Wear Sooner
Your mower blade is designed to lift the grass to make it stand tall. The blade then comes by and cuts the blades of grass.
In doing so, the mower blades don’t only lift grass, they also pick up sand, rocks, and toys that may have been left behind by children and pets.
It’s a good idea to inspect your blades regularly to minimize damage to your mower deck and prevent additional repair expenses.
Items that Can Damage the Mower Blade
Sticks, Rocks, and Toys
Lawn mower blades spin fast. Any items that come in contact with the blades can cause damage to them including sticks, rocks, and toys.
If a blade is damaged due to hitting an object, it can cause an uneven cut or worse yet, a vibration that can take out a crankshaft seal and cause an oil leak.
Sand & Nature’s Debris
If your lawn isn’t thick and plush with grass, chances are it includes a lot of sand, dirt, and other debris nature left.
You can’t do much to avoid coming into contact with these items. Over time this material will prematurely wear and dull the blade.
Lawn Chemicals
Chemicals used in the lawn to green the grass can cause damage to your mower blades. Some of the products consumers place in their yards are very corrosive to mower decks and blades.
The corrosiveness can make it difficult and nearly impossible to remove the blades from the mower. Remove blades periodically to prevent your mower blades from being stuck on your lawn mower.
How to Remove Mower Blades
Follow these steps to remove and inspect your mower blades:
- Gather tools to remove blades
- Ratchet
- Work Gloves
- Safety Glasses
- Cordless Impact Gun (Optional)
2. Remove Spark Plug Boot
It is an important safety precaution to remove the spark plug boot before attempting to remove your mower blades. Do not skip this step.
Removing the spark plug boot will prevent the engine from starting while you work under the mower deck
3. Remove Mower Blades
Use sockets and ratchets to remove the mower blades. Sometimes a great bit of effort is needed to remove blades. A cordless impact gun works well too.
Many people ask if lawn mower blades are reverse threaded. Most lawn mower blades are reverse threaded which is also known as right-hand threaded.
This means you will remove the nut and bolt that holds the blades on by spinning the blade off counter-clockwise.
4. Removing Stubborn Blade Bolts
If the mower blade bolt seems to be stuck, you can place a block of wood on the head of the bolt and hit the block with a hammer. This will shock the bolt and sometimes loosen it enough to help you remove it.
Inspect Mower Blades for Damage
The wear you see on the top of the sail, or fin as some people call it, may look thinner at the ends than it does toward the center of the blade. This is usually wear from sand and dirt that the blade sucks up during everyday mowing.
This is called normal wear and tear. If your blades are very worn around the end and thin you should replace the blades.
If you find chips and dings in the blade, this is usually the result of hitting items in the yard. Most of the time these chips and dings can be removed by sharpening the mower blades.
When large gouges exist in the blades, I recommend replacing them to maintain a good clean cut.
Inspect blades for any bends in the blade. If you are unsure whether a blade is bent, compare the old blade to a new blade. Blades need to be replaced if they are in this condition.
Replace the blade if you find a crack. Using a blade that is cracked can be extremely dangerous. A cracked lawn mower blade has the potential to break off while mowing which can send flying metal through the air. This could injure a person or cause damage to the siding of a home.
Should You Keep a Spare Set of Mower Blades on Hand?
I highly recommend you keep a spare set of mower blades on hand. Keeping an extra set of blades on hand will keep you mowing if you damage a blade while mowing or if you want to drop off a used set for sharpening without any downtime.
Nothing is more frustrating than getting 3/4 of the lawn mowed and noticing you need a new blade to finish the job. If you’re like me, you just want to keep going and get the job done.
It’s also nice to have an extra set of blades on hand especially if you want to have your blades professionally sharpened. This will allow you to leave a set with the sharpening center while you are able to mow with the other set.
The professional service center by me will have my blades sharpened in 1 business day, but during busy seasons they can get backed up for a few days. I don’t know about you, but I have a very busy life.
I want to be able to mow on my timeline and not someone else’s timeline, so I always have at least one extra set of blades.
How to Safely Sharpen Lawn Mower Blades DIY
Sharpening your own blades can save you time and money if you already have the tools you need in your garage. Keep in mind, you do not want to sharpen the blade to a sharp pointed edge. This will cause the blade to wear faster.
- Gather the tools you will need
- 10″ flat metal file, drill-powered blade sharpener, or disc grinder
- A vice to hold the blade in place
- Blade balancer or nail on the wall
- Rags
- Wire Brush
- Safety glasses
- Work gloves
2. Put on Safety Glasses and Gloves
3. Clean Blades with rags to clean and remove debris. Use a wire brush if dirt and debris aren’t easily removed with a rag.
4. Place the blade securely in the vice. After sharpening one side, you will flip the blade and secure it in the vice while you sharpen it.
5. File or grind the blade to sharpen the edge.
Sharpen with a metal file
- Using a file, push the file at a 45-degree angle in one direction along the blade.
- Do not use a sawing motion when filing.
- Once all of the rough spots and uneven edges are removed, flip the blade over, secure in the vice, and sharpen.
Sharpen with a drill-powered blade sharpener.
- Power the drill with the blade sharpener attached.
- Place the flat guide of the sharpener along the flat portion of the blade with the cutting edge slot into the bevel.
- Move the sharpener up and down the length of the blade edge.
- Once one side is sharpened without any rough spots or nicks, flop the blade over, secure in the vice, and sharpen using the same procedure.
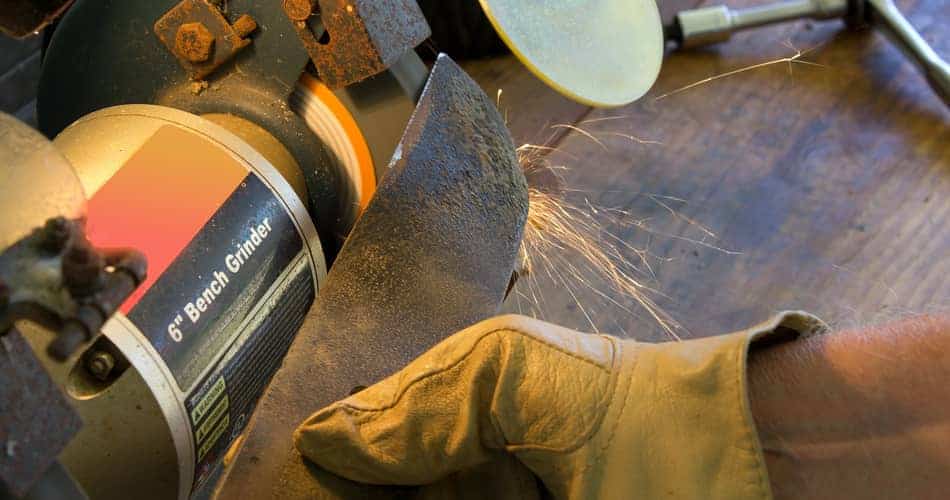
Sharpen with an angle grinder or bench grinder
- Hold the angle grinder perpendicular to the edge of the blade. Run the grinder along the length of the blade to level out any rough spots or nicks. Keep the grinder moving so it removes a little metal at a time and produces an even result.
- Once one side is sharpened without any rough spots or nicks, flop the blade over, secure it in the vice, and sharpen using the same procedure.
6. Make sure your blade is balanced
Once your blade is sharpened, you will want to make sure it is balanced to reduce vibration and prevent damage to your mower deck. Place the center hole of the blade over a nail on the wall.
If one end of the blade hangs lower than the other end, you will need to sharpen the end that hangs lower until they are equally balanced on the nail.
For a more precise guide for a balance blade, you can purchase a blade balancer.
When You Should Seek a Professional Sharpening Service
Many hardware and outdoor power equipment stores offer a blade sharpening service. It’s best to consult a service professional for the following reasons:
- It is a safer option to sharpen the blade yourself
- Sharpening a blade is often less expensive than purchasing a blade
- A professional can grind down mower blades to get rid of large nicks and gouges in the steel
- The blade is properly balanced. This will reduce vibration and damage to your mower deck.
Related Items
Mower Blade Types & Which Way a Mower Blade Goes On
I further explain how to put a blade on a lawn mower and the differences between high lift, low lift, mulch, and gator blades (also known as shredding blades) here.