
It may be your first time changing a lawn mower blade or it’s been a while and you just don’t remember how to put the blade on the mower. You are not alone. Many homeowners wonder which way the blade goes on a lawn mower.
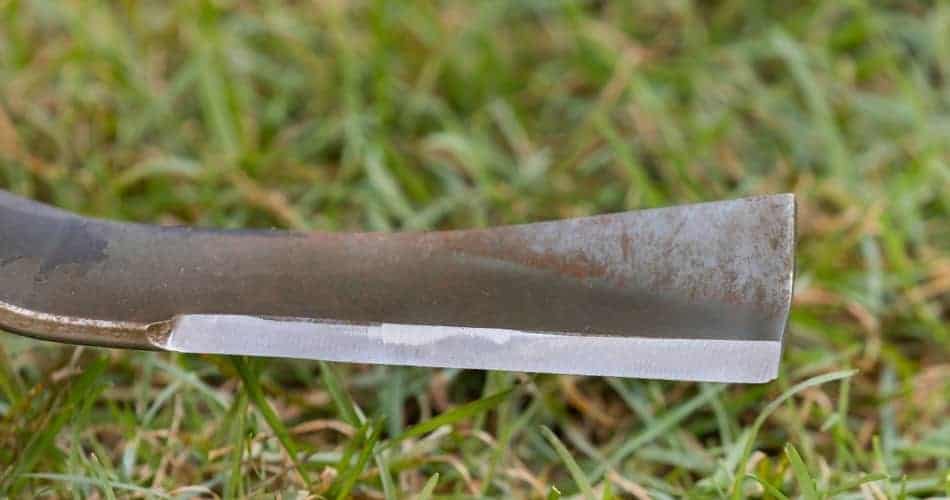
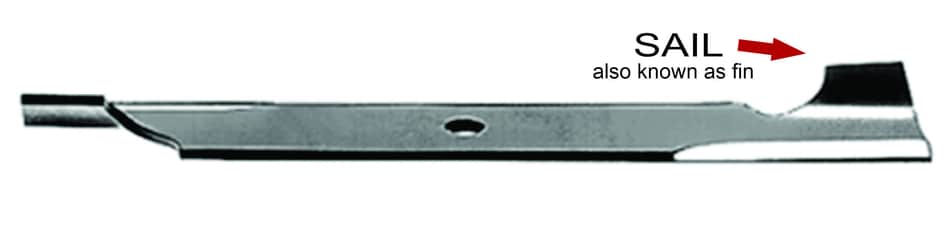
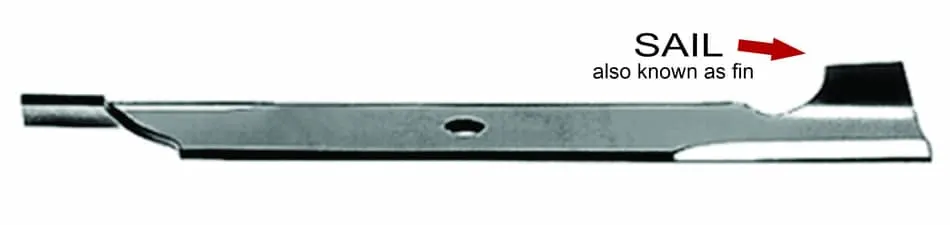
A blade goes on a lawn mower with the sail facing up towards the deck. The sail is the curved high side of the mower blade.
When the blade is installed correctly, the sail will draw the grass into an upright position while the blade passes by to give your lawn a nice cut.
Placing a mower blade with the sail facing the ground can cause damage to your mower and give you an uneven cut. Your grass will look like it’s been kind of roughed up and almost dirty looking.

This post may include affiliate links. Purchases made through these links may provide a commission for us, at no extra cost to you. As an Amazon Associate, we earn from qualifying purchases.
Follow all safety instructions provided in your equipment operator’s manual before diagnosing, repairing, or operating. Consult a professional if you don’t have the skills, or knowledge or are not in the condition to perform the repair safely.
Remember Which Way the Blade Goes
- Take one blade off at a time, sharpen, and replace it before you take the next blade off so you always have an installed blade to reference.
- Look for the bolt marks on the blade to see which way the bolt goes into the blade center hole and then attach.
- Look for the stamped GRASS SIDE or BOTTOM on the blade. Place the side that says GRASS SIDE or BOTTOM toward the ground.
- Always remember Sail Up!
Which Way Does a Blade Turn?
Does the mower blade turn clockwise or counter-clockwise? When looking down on your deck from the operator’s station, the lawn mower blades turn clockwise. If you are working underneath your deck and are looking at your blades from the bottom of your mower deck, the blades turn counter-clockwise.
4 Types of Mower Blade
1. High-Lift Blade
The high lift mower blade is designed for plush lawns and helps create that nice stripe in the lawn with its high sail. Most new lawn mowers come standard with a high-lift blade.
This blade will give you the best most precise cut. The high sail of the blade combined with the suction of the deck creates a lift to the grass to make it stand tall.
With the grass standing tall, the mower blade sweeps by the grass to create a precise cut.
In order to help you to create the best stripe with high lift mower blades, you need to keep your grass thick and long at a minimum of 3″ long with minimal weeds.
2. Low-Lift Blade
A low lift blade is used more for very dusty dry conditions. It has a shorter sail used to keep the wind down that is created underneath the mower deck.
The slight curve of the blade keeps the air movement to a minimum. The low-lift blade is ideal for short grass in sandy areas.
Keeping the dust down with these types of blades over high lift blades is best in dusty conditions because the suction from the deck and air movement isn’t pulling so much dirt into the cutter housings causing deterioration of the seals.
3. Mulch Blade
The mulching blade has a sail, but the blade has more of a swooping look to it. It does not have a straight edge like that of the high-lift or low-lift blade.
A mulch blade may need some extra baffling and a shield to block the discharge chute in order to work properly. The mulching blade tosses the grass in the air and is chopped up into many pieces by the blade as it passes.
Many lawn mower manufacturers offer an optional mulch kit for your mower deck that includes baffles and a chute blocker. Check with your lawn mower dealer to find a mulch kit option that works with your mower deck.
4. Shredding Blade / Gator Blade
The shredding blade or, as some people call it, a gator blade has a jagged edge on the sail to shred the grass blades after it has been cut. This helps make smaller grass clippings and smaller leaves in the fall.
Making smaller grass clippings will help the grass decompose quicker and give us a thatch layer on the lawn. The thatch layer keeps the lawn cool on a hot day.
It helps retain water after the lawn has been watered or after a good rain. The thatch layer provided a layer of protection to the grass from being worn out when we ride or walk on it.
Steps to Remove a Mower Blade
Follow these steps to remove your mower blades:
1. Gather Tools to Remove Blades
- Ratchet
- Work Gloves
- Safety Glasses
- Cordless Impact Gun (Optional)
2. Remove Spark Plug Boot
It is an important safety precaution to remove the spark plug boot before attempting to remove your mower blades. Do not skip this step.
Removing the spark plug boot will prevent the engine from starting while you work under the mower deck
3. Remove Mower Blades
Use sockets and ratchets to remove the mower blades. Sometimes a great bit of effort is needed to remove blades. A cordless impact gun works well too.
Many people ask if lawn mower blades are reverse threaded. Most lawn mower blades are reverse threaded which is also known as right-hand threaded.
This means you will remove the nut and bolt that holds the blades on by spinning the blade off counterclockwise.
4. Removing Stubborn Blade Bolts
If the mower blade bolt seems to be stuck, you can place a block of wood on the head of the bolt and hit the block with a hammer. This will shock the bolt and sometimes loosen it enough to help you remove it.
Mount Your Blade on a Lawn Mower
Most mower blades mount with a cap screw or two. Most blades will need 40 to 80-foot pounds to secure the bolt depending on the size of the bolts. Procedures vary by manufacturer.
Refer to your owner’s manual for manufacturer recommendations. A 9/16 socket up to a 13/16 socket will be used on many mowers. Some mowers like the Kubota lawn mower will take a 22 or 24-millimeter socket.
Are Your Blades on Upside Down?
Your mower blades are upside down if the sail or fin of the blade is pointed down. You will notice your grass gets beat up when running your blades upside down and you will have a very poor cut. Running a blade upside down can damage your spindles and cutter housings.
Inspect Your Mower Blades
Checking your mower blades and replacing them when necessary will help protect your mower deck from further damage.
Having a balanced set of sharp mower blades will ensure your lawn receives a nice cut. Dull blades will beat your lawn and cause it to look brown.
Bent or unbalanced blades can cause damage to the cutter housing, seals, and spindles. Unbalanced blades can also be the culprit when your mower is shaking.
How to Safely Sharpen Lawn Mower Blades DIY
Sharpening your own blades can save you time and money if you already have the tools you need in your garage. Keep in mind, you do not want to sharpen the blade to a sharp pointed edge. This will cause the blade to wear faster.
- Gather the tools you will need
- 10″ flat metal file, drill-powered blade sharpener, or disc grinder
- A vice to hold the blade in place
- Blade balancer or nail on the wall
- Rags
- Wire Brush
- Safety glasses
- Work gloves
2. Put on Safety Glasses and Gloves
3. Clean Blades with rags to clean and remove debris. Use a wire brush if dirt and debris aren’t easily removed with a rag.
4. Place the blade securely in the vice. After sharpening one side, you will flip the blade and secure in the vice while you sharpen.
5. File or grind the blade to sharpen the edge.
Sharpen with a metal file
- Using a file, push the file at a 45-degree angle in one direction along the blade.
- Do not use a sawing motion when filing.
- Once all of the rough spots and uneven edges are removed, flip the blade over, secure in the vice, and sharpen.
Sharpen with a drill-powered blade sharpener.
- Power the drill with the blade sharpener attached.
- Place the flat guide of the sharpener along the flat portion of the blade with the cutting edge slot into the bevel.
- Move the sharpener up and down the length of the blade edge.
- Once one side is sharpened without any rough spots or nicks, flop the blade over, secure in the vice, and sharpen using the same procedure.
Sharpen with an angle grinder or bench grinder
- Hold the angle grinder perpendicular to the edge of the blade. Run the grinder along the length of the blade to level out any rough spots or nicks. Keep the grinder moving so it removes a little metal at a time and produces an even result.
- Once one side is sharpened without any rough spots or nicks, flop the blade over, secure it in the vice, and sharpen using the same procedure.
6. Make sure your blade is balanced
Once your blade is sharpened, you will want to make sure it is balanced to reduce vibration and prevent damage to your mower deck. Place the center hole of the blade over a nail on the wall.
If one end of the blade hangs lower than the other ends, you will need to sharpen the end that hangs lower until they are equally balanced on the nail.
For a more precise guide for a balance blade, you can purchase a blade balancer.
When You Should Seek a Professional Sharpening Service
Many hardware and outdoor power equipment stores off a blade sharpening service. It’s best to consult a service professional for the following reasons:
- It is a safer option to sharpen the blade yourself
- Sharpening a blade is often less expensive than purchasing a blade
- A professional can grind down mower blades to get rid of large nicks and gouges in the steel
- The blade is properly balanced. This will reduce vibration and damage to your mower deck.